How To Light Up Your Garden At Night
By Steven Stead
Are you tired of your garden disappearing after sunset? Do you dream of extending your time outdoors and enjoying the beauty of your landscaping, even when it's dark?
If that sounds like you then this garden lighting ‘how to’ guide is for you.
We’ll help you transform your outdoor space into a magical extension of your home by taking you through every step of the process, from understanding the basics to enjoying your beautifully illuminated garden.

This ‘how to’ on finding the perfect light for the garden will help you create a stunning outdoor space with the perfect lighting solution, no matter your budget or experience level.
1. Understanding the Basics of Outdoor Lighting
Before you start browsing lighting fixtures, it's essential to understand the fundamental principles of outdoor lighting.
A solid grasp of the different types of lighting, along with key technical considerations, is crucial for any successful garden lighting project.
Types of Outdoor Lighting
Outdoor lighting generally falls into three main categories:
· Ambient Lighting: This provides overall illumination for your garden – think of it as the general background light that creates a soft, welcoming atmosphere. It's often used to light pathways, patios and decks, allowing you to see where you’re going while creating a pleasant ambiance. Consider introducing low-level, diffused lighting for this purpose.
· Task Lighting: As the name suggests, task lighting serves a specific purpose. It provides brighter, focused light for areas where you need to perform tasks, such as outdoor cooking, or on seating areas where you might read, or steps where clear visibility is essential for safety.
· Accent Lighting: Accent lighting is used to highlight specific features in your garden. This could be a prized tree, a striking sculpture, a water feature, or even architectural details of your home. It adds depth and visual interest, drawing the eye to focal points to create a dramatic effect.

Key Considerations On How To Light Up Your Garden At Night
Beyond the types of lighting, several technical aspects should be considered when planning your outdoor lighting:
· IP Rating On Light Fixtures: This is critical. The Ingress Protection (IP) rating indicates how well a fixture is protected against dust and moisture. For outdoor use, you'll need fixtures with a suitable IP rating to withstand the elements. The higher the IP number, the greater the protection. Look for ratings of IP44 or higher for general outdoor use, and IP65 or better for areas exposed to more water, such as near ponds or water features, or which have little or no protection from the elements.
· Bulb Type: LED bulbs are now the most popular choice, offering long lifespan and low energy consumption. Halogen bulbs are less energy efficient but offer a bright, white light. You also need to think about the ambiance or feel of the light generated by a light bulb. This is known as colour temperature, which is measured in Kelvin and ranges from warmer light (around 2,700K-3,000K) to cooler lighting (4,000K-6,000K), which provides brighter, more functional illumination.
· Power Source: Outdoor lighting can be powered in several ways:
o Mains Power: This is the most common option for permanent installations, providing a reliable and consistent power supply. However, it requires wiring and will require the expertise of a qualified electrician.
o Solar Power: Solar-powered lights are a more environmentally friendly option, harnessing energy from the sun. They are easy to install as they don't require wiring but their performance can be affected by weather conditions and the amount of sunlight they receive.
o Battery Power: Battery-powered lights offer flexibility and portability. They are ideal for areas where wiring is difficult or impractical. However, batteries will need periodic replacement or, if you’re using rechargeable batteries, changing regularly.
2. Planning Your Outdoor Lighting Design
Now we’ve covered the basics, it's time to start planning your design.
This stage is crucial for achieving the desired effect and ensuring your garden lighting is both beautiful and functional. A well-thought-out plan will save you time money, and frustration in the long run.
Defining Your Goals
Before thinking about how to light up your garden at night and the specific fixtures you need, it’s important to ask yourself what your goals are and what success will look like for you.
Consider these key aspects as part of your thinking:
· Security: Do you want to deter intruders and enhance the safety of your property? If so, you'll need bright, strategically placed lights, especially around entrances, pathways and any area of your garden which is potentially vulnerable. Motion-sensor lights can be a particularly effective security measure.
· Aesthetics: Are you aiming to create a visually stunning outdoor space? If so, think about the mood you want to create. Do you envision a romantic, tranquil garden, or a vibrant, entertaining space? This will influence your choice of lighting styles, colour temperatures of the lighting i.e. ambiance, and techniques used.
· Functionality: How will you be using your garden at night? Do you need bright light for outdoor cooking or dining? Or do you simply want to illuminate pathways for safe navigation? Consider the practical needs of your outdoor space and plan your lighting accordingly.
Assessing Your Garden
Next, take a close look at your garden – understanding its characteristics will help you optimise your lighting design:
· Size: The size of your garden will dictate the number and type of fixtures you need. A small garden might benefit from subtle, focused lighting, while a larger garden can handle a more elaborate scheme with layers of light.
· Layout: Consider the layout of your garden, including pathways, patios, flowerbeds and other features. Identify areas that you want to highlight, areas that require functional lighting and areas that aren’t important.
· Existing Features: Take note of existing features like trees, shrubs, walls and water features. These can become focal points for your lighting design. Think about how you can use lighting to accentuate their beauty and create visual interest. What do you want to be the star of the show?

Creating a Lighting Plan
With your goals and garden assessment in mind, you can start creating a detailed lighting plan.
· Identifying Focal Points: Determine which features you want to emphasise. These could be architectural elements of your house, a beautiful tree, a water feature, or a special planting.
· Determining Lighting Levels: Consider the appropriate light levels for different areas. You'll need brighter light for task areas and pathways, while ambient and accent lighting can be more subtle. To assist your planning, read our blog article on How Bright Should My Garden Lights Be?
· Choosing Lighting Techniques: Experiment with different lighting techniques to achieve the desired effect:
o Uplighting: Directing light upwards to highlight trees, larger plants, architectural features, or sculptures.
o Downlighting: Casting light downwards for general illumination or to highlight pathways and patios.
o Path Lighting: Using low-level lights to illuminate walkways and create a sense of direction.
o Spotlighting: Focusing a beam of light on a specific feature.
o Moonlighting: Creating a soft, natural glow by positioning lights high in trees to mimic moonlight.

At this stage, it will be helpful to create a very rough sketch of your garden so you can mark where you’re thinking of adding lighting fixtures. This will allow you to visualise your plan and the effect each fixture will have so you can make adjustments before you start purchasing and installing your lights.
3. Selecting the Right Outdoor Lighting Fixtures
Once you’re happy with your lighting plan, it's time to choose the right fixtures.
Remember that the style, material and functionality of your chosen fixtures will significantly impact the overall look and feel of your garden lighting.
Popular Types Of Lighting Fixtures
Here are some of the most popular outdoor lighting fixtures to consider:
· Path Lights: These low-level lights are designed to illuminate walkways and pathways, providing safety and guidance. They often feature a downward-facing light to prevent glare.
· Spotlights: Spotlights are used to highlight specific features, such as trees, sculptures, or architectural details. They provide a focused beam of light that can have its angle adjusted to create different effects.
· Floodlights: Floodlights provide a broad, powerful beam of light, ideal for illuminating larger areas or for security purposes. They are often used to light up driveways, patios, or entire sections of a garden. However, buy with caution as their light can appear harsh, especially if it’s too strong.
· Wall Lights: Wall lights are mounted on walls or fences, providing both ambient and task lighting. They can be used to illuminate entrances, patios, or architectural features.
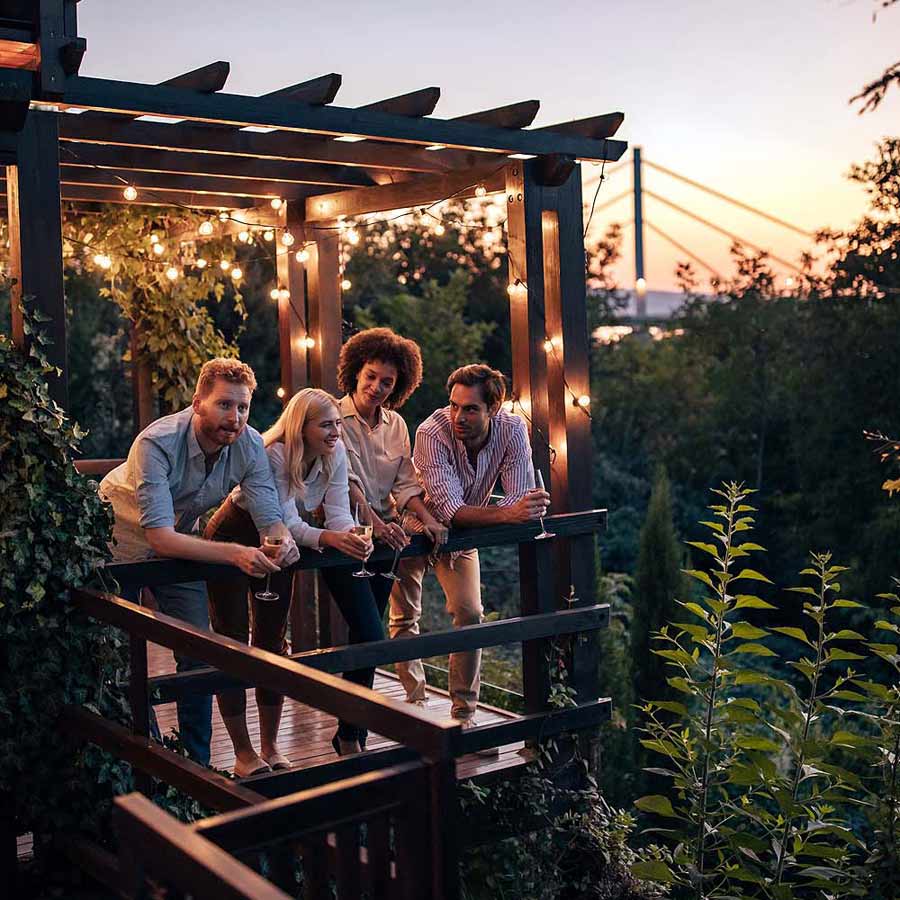
· String Lights: String lights, also known as festoon lights, add a playful and informal ambiance to any outdoor space. They are perfect for creating a festive atmosphere on patios, decks, or pergolas.
· Lamp Posts: These are different to the ones you see in our streets and come up to about your waist. They’re usually used to light driveways and paths but can be used in other areas as well, depending on what you’re trying to achieve.

Material Considerations
The materials used in your outdoor lighting fixtures will impact their durability, weather resistance and overall aesthetic.
Consider these factors when making your selection:
· Durability: Outdoor lighting is, of course, exposed to the elements so it’s important to choose fixtures made from robust materials such as aluminium, stainless steel or copper to reduce the chances of rust and corrosion.
· Weather Resistance: Choose fixtures with an appropriate Ingress Protection (IP) rating. This will ensure they can withstand rain, snow, and other weather conditions. If you want further information, you can read more on our article on IP ratings for outdoor lights.
· Style: Try to choose fixtures which complement your home's architecture as well as your personal taste. It doesn’t matter whether you prefer a traditional, contemporary, or modern look, there will be lighting available to match your style. Consider the finish of the fixture as well. A black colour can create a dramatic contrast, while a brushed nickel or copper finish can add a touch of elegance. If you’re not sure, take a picture of your house and compare images of each light type to see what you think will work.
When selecting your fixtures, keep your lighting plan to hand so you can visualise how your new outdoor lighting will look in your garden.
Think carefully about the best size and type of lighting for each location and don't be afraid to mix and match different fixture types to create a layered and dynamic lighting scheme. We have a blog post on layered lighting in gardens if you’re interested in learning more.
4. Installing Your Outdoor Lighting
Once you’ve finalised your lighting plan and bought your outdoor lighting, the next step is installation.
DIY vs. Professional Installation
The complexity of your outdoor lighting project will determine whether you can tackle it yourself or if you should call in a professional electrician.
· DIY Installation: Simple installations, such as solar-powered path lights or battery-operated string lights, are typically suitable for DIY installation. These often involve minimal wiring and can be easily set up with basic tools.
· Professional Installation: If you’re going to be dealing with mains power for your outdoor lighting, you must hire a professional. Working with mains electricity can be dangerous and incorrect wiring could cause a fire. A professional electrician will ensure the installation is done safely and complies with all local regulations. That’s not to say you can’t position the lights where you want them and perhaps prepare the ground for the installation of cabling (if it’s required) but everything should be under the direction of a qualified electrician.
Wiring and Power Sources
Understanding the different power sources and wiring requirements is essential for a successful installation:
· Mains Power: Mains-powered lighting offers reliability and consistent brightness but requires careful wiring. This usually involves running cables underground or along walls, and connecting them to your home's electrical supply. It's crucial to use weatherproof cables and connectors designed for outdoor use.
· Solar Power: Solar-powered lights are easy to install as they don't require wiring. However, they will need sufficient sunlight to charge their batteries so will need to be positioned in exposed locations, away from trees. Their performance will also be affected by cloud cover and low light levels in the winter.
· Battery Power: Battery-powered lights offer flexibility but require periodic battery replacements. They are suitable for areas where wiring is difficult or impractical.
After installation, test all your lights to ensure they’re working correctly. Make any necessary adjustments to the positioning or angle of the fixtures to achieve the effect you’re looking for.
With careful planning and proper installation, you can transform your garden into a beautifully illuminated outdoor space that you can enjoy for years to come.
5. Maintaining Your Outdoor Lighting
Following installation, regular maintenance is key to ensuring its longevity and optimal performance.
Regular Maintenance
Here are some essential tasks:
· Cleaning Fixtures: Regularly clean your fixtures to remove dirt, debris and cobwebs. Use a soft cloth and a mild detergent solution. Avoid using harsh chemicals or abrasive cleaners, as these can damage the finish of your fixtures. Pay particular attention to lenses and light diffusers, as these can become cloudy, reducing light output. Make sure the cloth is damp rather than dripping wet as some lights will only be weather resistant rather than fully waterproof.
· Replacing Bulbs: Replace burned-out bulbs promptly to maintain consistent illumination. When replacing bulbs, make sure you choose the correct type and wattage for your fixtures.
· Checking Wiring: Periodically inspect wiring and connections for any signs of damage, such as from rodents, or wear. Look for frayed wires, loose connections or corrosion. If you find any issues, address them immediately to prevent safety hazards and contact a qualified electrician if your lighting is connected to the mains.
Energy Efficiency Tips
Maintaining your outdoor lighting also involves optimising its energy efficiency. Here are some tips to help save money on your electricity bill:
· Using Timers and Motion Sensors: Install timers or motion sensors to control your outdoor lights. This will ensure they’re only on when needed, reducing energy consumption.
· Opting for Energy-Efficient Bulbs: As mentioned earlier, switching to LED bulbs is one of the most effective ways to improve energy efficiency. LEDs use significantly less energy than traditional incandescent or halogen bulbs, and they also last much longer.
· Regularly Checking for Faults: Inspect your lighting system regularly for any faults, such as flickering lights or lights that stay on even when they should be off.
By following these simple maintenance tips, you can keep your outdoor lighting system in excellent condition for years to come. Regular maintenance will not only enhance the beauty of your garden but also ensure safety and energy efficiency.
If you're looking for more information, check out BBC Gardener World Magazine article on How To Light Your Garden In Style.
6. Frequently Asked Questions (FAQs)
We've covered a lot of ground in this guide, but you might still have some questions. Here are some frequently asked questions about outdoor lighting to help you further clarify the process:
Q: How do I choose the right bulb colour temperature for my garden?
A: Bulb colour temperature is measured in Kelvin (K). Light with a warmer feel (2,000K-3,000K) creates a warm and inviting atmosphere, which is great for patios and areas where you want to relax. Cooler light (4,000K-6,000K) provides brighter, more functional illumination and is suitable for pathways, security lighting and task areas. Consider the overall ambiance you want to create and the specific purpose of the lighting when choosing the colour temperature of the bulbs. Check out our blog article on colour temperature to learn more.
Q: How can I protect my outdoor lighting from harsh weather?
A: Choose fixtures with an IP rating that’s suitable for outdoor use. However, simply having an IP rating does not necessarily mean a light fixture is ready for the outdoors. Generally speaking, the higher the number, the better the protection. If you are siting your lighting in particularly exposed locations then aim for IP65 or better as this is considered by many to be waterproof rather than only water resistant. Regularly inspect your fixtures for any signs of damage or wear and consider using weatherproof covers or shields for particularly harsh environments. Read more about IP ratings for gardens and outdoor spaces here.
Q: How can I create a romantic outdoor ambiance with lighting?
A: Layering your lighting is key to creating a romantic ambiance. This involves using a combination of soft, ambient lighting, subtle accent lighting and perhaps some warm-toned string lights. Dimming your lights can also create a more intimate and relaxed atmosphere. Consider using uplighting to highlight trees or architectural features, and downlighting to create a gentle glow on pathways and patios. You can find out more in our blog article about layering light in gardens.
Q: What is the ideal height for path lighting?
A: The ideal height for path lighting typically ranges from 30 to 45cm. This height provides adequate illumination for walkways without creating glare. Consider the style of your path lights and the surrounding landscape when determining the best height for your garden.
Q: How do I minimise light pollution with my outdoor lighting?
A: There are a range of measures to consider. First, use shielded fixtures that direct light downwards to help prevent unwanted light being sent further afield. You should also consider choosing bulbs (or lights) with a lower light output in terms of lumens, and use timers or motion sensors to ensure lights are only on when needed. Consider the impact of your lighting on your neighbours and the surrounding environment. Our blog article has more information on how bright should my garden lights be.
Q: Can I use smart bulbs in my outdoor lighting fixtures?
A: Many smart bulbs are designed for outdoor use. These bulbs offer features like adjustable colour temperature, dimming capabilities and even remote control through a smartphone app. Ensure that the smart bulbs you choose are rated for outdoor use and are compatible with your existing fixtures.
Q: How often should I clean my outdoor lighting fixtures?
A: It's generally recommended to clean your outdoor lighting fixtures at least once or twice a year, or more frequently if they are exposed to a lot of dirt or debris. Regular cleaning will help maintain their brightness and extend their lifespan.
Q: What should I do if my outdoor lights are flickering?
A: Flickering lights can be caused by several factors, including loose connections, faulty bulbs or wiring issues. First, check the bulbs to make sure they’re properly installed and not burned out. If the problem persists, ask an electrician to check the wiring and connections.
Q: Are solar lights as bright as mains powered lights?
A: Generally, solar lights are not as bright as mains-powered lights. However, they are constantly improving and can be sufficient for ambient and pathway lighting. Consider the specific lighting needs of your garden when deciding between solar and mains-powered options. For brighter, task-oriented lighting, mains-powered lights are usually the better choice. You should be able to get a good idea of the potential performance of solar lights by checking their specifications. Learn more in our blog article on the effectiveness of solar lights in the UK.
8. Conclusion
We hope this ‘how to’ garden lighting blog post means you now know how to light up your garden at night.
Taking a little time to understand the principles of outdoor lighting, carefully planning your design and selecting the right fixtures can help you create a truly magical outdoor space that you can enjoy long after the sun sets.
Remember to consider your lighting goals, assess your garden's unique features, and choose lighting techniques that highlight its beauty and functionality.
Whether you're illuminating pathways for safety, creating a cosy ambiance for relaxation, or showcasing your favourite plants, the right lighting can make all the difference.
Don't be afraid to experiment with different lighting techniques and fixtures to achieve the desired effect. And remember, regular maintenance will ensure your garden lighting continues to shine brightly for years to come.
Now that you're equipped with the knowledge and inspiration, it's time to embark on your outdoor lighting journey. Start planning, get creative and illuminate your garden with the magic of light!